Final Preview of what we are going to create today!
 | ||||||
| Final preview |
Click read more to view this tutorial or click on this link to view video
So lets begin with the tutorial
Step1 Open image of a cloth (in this tutorial we are using a silk cloth) in photoshop
you can download this image from here SILK
Step 2
create a new text layer and write what you want to.
choose your desired font and size
the color of the text should be WHITE for best results
Step 3
now hide the text layer for a while and open the channels tab
choose the channel with good contrast, in this case it is blue
 |
| channel |
Step 4 : Very Important
now press ctrl+A to select the current channel and press copy merged
create a new document with the same file size and save it in psd format
this file will be used later for displacing the text
Step 5
now unhide the text layer and select it
after selecting go to layer>rasterize>type
or simply right click on the text layer and press rasterize
Step 6
after rasterizing the text layer go to filter>distort>displace
a window will pop up will will ask you for the settings
choose 8 for horizontal and vertical scale for this image and click OK
Step 7
after entering settings it will ask you for the displacement file you saved before in step 4
click and open
Step 8
after applying the displacement map the effect will be visible on the text layer
Step 9
copy the background image (silk cloth) and place it above the text layer
Step 10
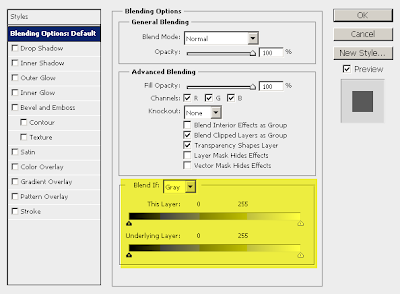
now double click on background copy layer thumbnail to open the blending options
or go to layer>layer style>blending options

see the yellow highlighted area
we will make changes in this
choose blue from "blend if" drop down options
Step 11
now slide the slider to a little left
Important : Press ALT+click on the slider to break it into two
move half part of the slider to left and half to right
we could see our background layer blending with text layer and acquiring depth
Step 12
after adjusting the blending , we have our final image ready
here is before and after the displacement and blending
Final Preview
Thanks for reading.
hope you like it..!
watch video of this tutorial


nice tutorial
ReplyDeletethanks......
Very cool. Thanks.
ReplyDeleteNice tutorial
ReplyDeleteJust images finding it difficult to load